
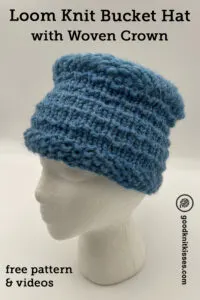
Inside: Learn how to loom knit a Bucket Hat! This design features a woven crown, Andalusian stitch body and seed stitch brim. Includes instructions and videos.
Earlier this year I tried out weaving on a round loom. I loved the result and decided to include the technique in a full project.
I debated between a basket and market bag for a while. But ultimately, I wanted to see how it looked in a hat design.

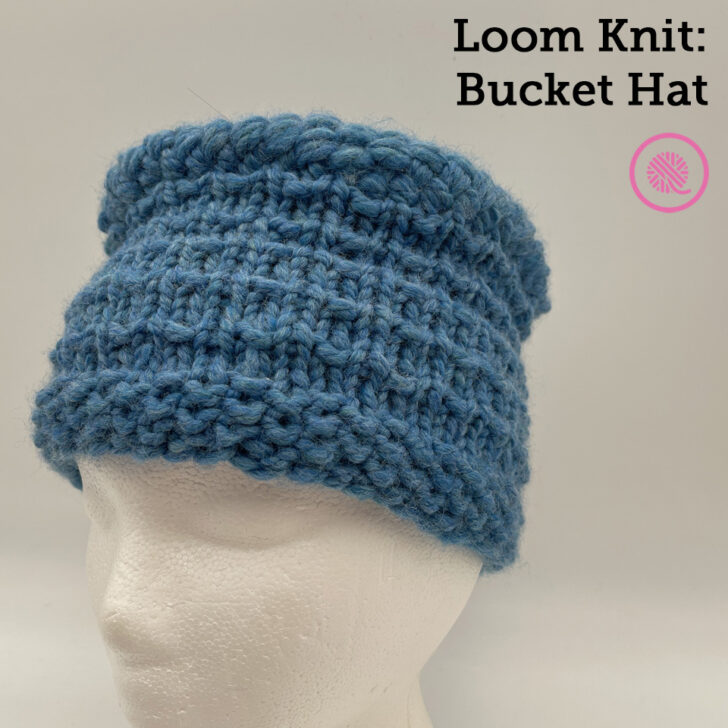
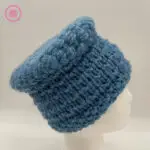
I love the loom knit Bucket Hat!
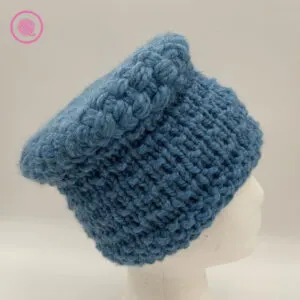
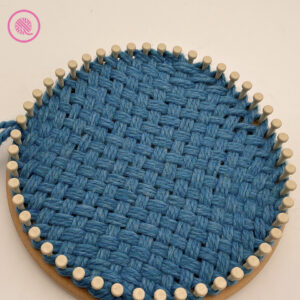
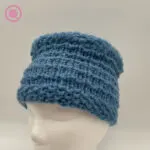
It turned out beautifully. The woven top curls down a little bit at the crown giving it a fun, whimsical shape. I chose the Andalusian stitch pattern for the main part of the hat and finished it up with a seed stitch brim.
The pattern below includes detailed notes and instructions to help you loom knit a bucket hat. Each part of the hat (crown, main body and brim) has it’s own fully-captioned tutorial video teaching the technique or stitch pattern. I also made a video showing an overview of the pattern to guide you through the process.
Loom Knit a Bucket Hat: Pattern Overview Video
Loom Knit Bucket Hat
by Kristen Mangus
An ad-free downloadable PDF of this pattern is available for purchase in my GoodKnit Kisses online store, Etsy or Ravelry at the links below:


MATERIALS
(Materials list may contain affiliate links to products I used to make this project. Using these links costs you nothing, but helps support GKK.)
Yarn
Bulky (#6) weight yarn
Lion Brand Wool Ease Thick and Quick in color Sky Blue (discontinued) used in sample. 1 ball (6oz/170g/106 yards/97m)
Loom
⅝” large gauge (LG) round loom with 48 pegs.
CinDWood 48 peg Adult Hat loom used in sample. [Use code goodknitkisses for $5 off a CinDWood knitting loom.]
Notions:
Crochet hook or weaving tool (to help with weaving)
Loom tool (to finish off ends)
2-3 Stitch markers or rubber bands (to mark pegs on loom)
(Optional) Ruler, knitting needle, spare yarn (to mark center line on loom)
ABBREVIATIONS
EK = E-wrap knit
K = Uwrap knit
P = Purl
Rem = Remain
Rep = Repeat
Rnd = Round
St(s) = Stitch(es)
For a refresher on loom knitting basics see the blog posts below to get started:
13 Questions for Beginner Loom Knitters
How to Loom Knit Basics (cast on, knit, purl, & bind off)
How to Loom Knit Basic Stitch Patterns (garter st, seed st and ribbing)
How to Loom Knit in the Round
GAUGE 10 sts x 22 rows in 4” in Andalusian st pattern
SKILL LEVEL Intermediate
SIZE Adult
MEASUREMENTS 8.5” tall x 21.5” diameter [21.5 x 55 cm]
NOTES
The Bucket Hat begins with weaving the hat top then switches to loom knitting. You loom knit from the top down using the Andalusian stitch for the body and finish with a seed stitch brim.
Loom Options: This pattern requires a rigid, round loom and will not work correctly on square, oval, rectangle, X-shaped or flexible looms. This pattern will work with any round loom with an even number of pegs, but using a loom with a gauge larger than ⅝” will leave the woven top looser and there may be gaps in the weave.
Hat Height Measurements: Because the top of the hat is flat, this hat does not measure the same way that a traditional crowned hat does. The total height for the hat is only 6”, but it still fits an average adult head. These are my approximate height measurements for each hat part:
Top: About 1.5” of the woven top will naturally curl down on the sides.
Body (in Andalusian st): 3.5” [For a taller hat, add more repeats to this section.]
Brim (in seed st): 1”
Hat Size: Use any ⅝” large gauge loom with an even number of pegs. 54 and 60 peg looms are available at CinDWood Looms to make larger hats.
PIN IT!

Bucket Hat: Woven Top

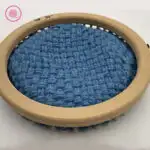
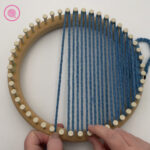
Loom Setup and Measuring Yarn:
- Mark the two pegs by the anchor peg with stitch markers or rubber bands.
If your loom does not have an anchor peg pick any two pegs to start with.
2. Lay a long straight object (ruler, knitting needle, etc.) between the marked pegs and across the center of the loom to the opposite side. The two pegs on each side of your object are the center pegs. Mark these two pegs with a stitch marker or rubber band.
3. Leaving a 12″ yarn tail, lay your yarn strand between two pegs on the side of your loom at the halfway point. Wrap the peg above where you started by wrapping around the outside of the peg and back to the center. Move to the peg below you starting pair and wrap that one. Continue wrapping pegs in a zig zag pattern from top to bottom until you have wrapped 1 peg past your marked pegs on both the top and bottom. Do NOT cut the strand.
4. Hold on to the yarn strand securely at the end of the wrapping and carefully remove the yarn from the wrapped pegs. Where you are holding the yarn is the middle of your weaving strand. Pull enough yarn from your ball to double the length of your weaving strand.
5. Measure 1-2 more strands the same length as your first weaving strand. (I used 3 strands.)
6. Tie all three strands together into a loose slip knot and place on anchor peg.


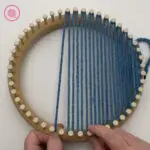
How to Weave on a Circle Loom
- Begin by bringing working yarn between the two marked pegs by your anchor peg.
- Next, wrap around the outside of both center pegs on opposite side of loom and bring your working yarn back to the center.
- Then wrap around the outside of both starter pegs and bring the working yarn to the center. Now we are ready to start weaving.
- Bring the working yarn UP to the next unwrapped peg on the same side. Wrap the peg around the outside and back to the center.
- Weave the working yarn alternating UNDER then OVER until you reach the empty peg on the opposite side. Wrap the yarn around the outside of the empty peg.
- Tug your working yarn DOWN to the next unwrapped peg at the bottom of the same side and wrap that peg. Your woven strands will travel down with you.
- Wrap the bottom peg on the opposite side.
- Repeat Steps 4-8 until you have 1 empty peg on either side. NOTE: When you reach the last few pegs on the sides the yarn will bunch together tightly. Use a crochet hook or weaving tool to carefully weave the strands correctly.
- For your last peg, wrap the outside and weave under and over all the way across the loom pulling the yarn tail through at the end. Your yarn tail should come out between the two pegs at the side.
- Finish off ending yarn tail: Using loom tool on the ending peg, pull yarn tail up from the bottom as if to purl. Pull yarn tail all the way through and leave to weave in later.
- Finish off beginning yarn tail: Using loom tool on starting peg, pull yarn tail down from the top as if to knit. Pull yarn tail all the way through and leave to weave in later.
- Lay all tail yarns (6) inside loom to weave in after hat is finished.
- Do not take ANY loops off of pegs. You will begin loom knitting with these loops.
Now that I’ve gone through the complicated instructions, I’m sure you want to watch the video!
Bucket Hat Woven Crown Tutorial Videos
Right handed
Left handed
Bucket Hat Body: Andalusian Stitch

Begin knitting in the round with 1 strand from your ball of yarn. For less bulk, do not use a slip knot. Begin the Foundation Row on Peg 1 by E wrapping the peg and leaving about a 6” yarn tail.
Foundation Row: EK all.
Rnd 1: K all.
Rnd 2: *K1, P1. Rep from * to end of rnd.
Rnd 3: K all.
Rnd 4: K all.
Rep Rnds 1-4 four times (approx 3.5” of Andalusian st) or knit to desired length.
Rnd 5: K all.
Right handed:
Left handed:
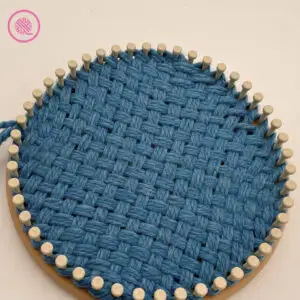
Bucket Hat Brim: Seed Stitch

NOTE: The tutorial video for this section only shows this stitch pattern loom knit as a flat panel. You can see the basic stitch pattern on the video, but please follow the instructions to work this in the round.
I also modified the stitch pattern slightly to smooth out the transition between rounds so you will want to follow the written instructions below. Typically, at the end of a seed stitch round you have either 2 knits or 2 purls next to each other. Because I’m working with a super bulky yarn, 2 purl stitches next to each other made the transition between rounds very noticeable. I opted to alter the end of the round to make sure I always used 2 knit stitch next to each other and this smoothed it out.
Rnd 6: *K1, P1. Rep from * until 2 st rem. K2.
Rnd 7: *P1, K1. Rep from * to end of rnd.
Rnd 8: *K1, P1. Rep from * until 2 st rem. K2.
Rnd 9: *P1, K1. Rep from * to end of rnd.
Rnd 10: *K1, P1. Rep from * until 2 st rem. K2.
Brim will be about 1”. For a wider brim rep Rnds 9-10 to desired length.
Bind off in pattern. Weave in tails. TIP: Weave tails from woven hat top one at a time using a whipstitch through the seam where the woven top and loom knitting meet.